This blog is a reflection on a Scratch project I have been working on. I wanted to capture, at an overview level, my thinking and progression through this project.
The purpose of this post is exploratory and preliminary. I’ve started a collaborative inquiry with one of the teachers I am working with this year, and his class of grade 5 students on a year-long project to eventually move from generally non-reflective learning to intentional, reflective learning, especially within the domains of mathematical and computational thinking. I will be writing more about that inquiry in a later post.
In my Scratch project, I am trying to use an array in Scratch (called a list) to contain the parameters of a large, virtual map that could be used as an interactive world in which a game or adventure could take place. Ultimately, I want to generate a large map made up of tiles measuring 20×20 pixels. The overall map might be 100×100 tiles in size, perhaps. Initially, I am thinking I need to know at least three things about each tile of the map:
- Row position
- Column position
- Tile attribute ID (a number that would denote both the kind landform and what item, if any, would be available in that tile – e.g., grass, sand, water; grass + flower, sand + flower, water + fish)
Since Scratch only comes with the capability to create one dimension arrays, I decided to try to use three lists simultaneously, one array of values for each attribute; as long as I used the same index number, it would act like a three-dimensional array. As I thought about it more, I realized that this approach would not work. I could not get three lists to work like a matrix of values. What I needed was a two dimensional array that would hold whatever value for the Tile attribute ID. I cannot use a two Scratch lists (using the same index number) as that does not define a 2D matrix of distinct variable containers. I was stuck.
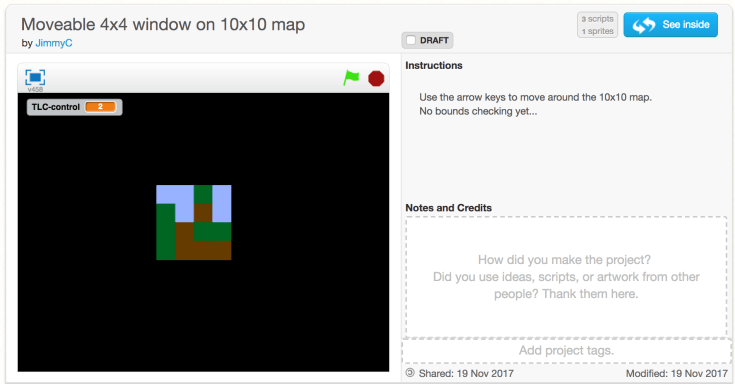
Anyway, quite a while ago, I created a first project that initializes and draws a map made of 18×18 tiles (and each tile was 20×20 pixels, as noted above). That seemed to work okay. The project that creates and draws the map is linked below. Note that you cannot move around in the map; it just creates a map and displays it on the stage.

I recently revisited this Scratch 2D mapping project again. In order to help me think about it, I simplified the problem. I thought of a 10×10-tiled full-size map, displaying 4×4-tiled window portion of the full map. I spent some time again considering how I might create a two dimensional array (using a function block in Scratch) but it was getting very complicated… needlessly complicated for the goals of this project.
I decided to go back to my original idea of using one list (array) in Scratch to store the Tile attribute ID value for each tile of the 10×10 square array of tiles. So, using this linear approach, items 1-10 of the array would correspond to row 1 and columns 1-10; items 11-20 would correspond to row 2, columns 1-10, items 21-30 correspond to row 3 and so on. The 10×10 map grid is simply arranged in a 100 item long list.
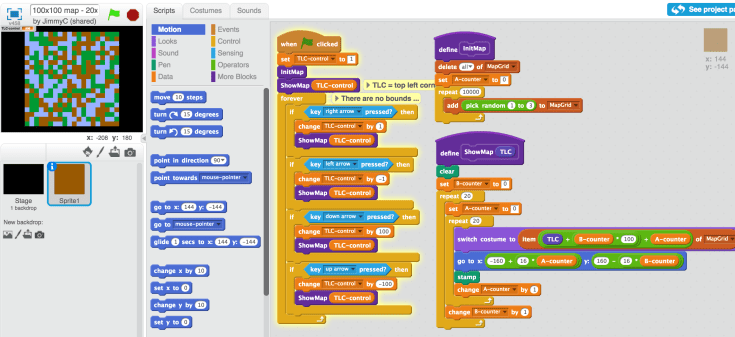
In order to display the 4×4 window onto the map, I needed to apply some patterning and algebraic thinking to the function that located the top, left corner (TLC) of the 4×4 grid of tiles. Now that I have written the code successfully, it seems simple now to reflect on it but I needed to think through the values systematically to make sure I had the pattern.
My idea was that the function would be passed one value, namely, the top left corner location of the 4×4 grid to show. The function would essentially determine the correct tiles to show from the linear array and the correct positions on the stage to stamp them. Before I wrote the function, I played around on some grid paper and drew this to get it visually clear:

After doing this, I felt more confident about how to code the loops in the function and proceeded to write the code. Eventually, the code for the function took shape like this:

The inner loop draws the 4 tiles in the row, the outer loop controls which row is being rendered by the inner loop. I wrote the function in such a way that it could be later expanded to draw a much larger map grid, and a larger window portion to display. The go to x: y: block controls where on the stage the tiles appear.
Here is the project that contains the 10×10 full-size map and the 4×4 display window. You can play with it yourself and see that the it works to only ever show a 4×4 portion of the full 10×10 map. Use the arrow keys to ‘move around’ in the map.
The final task to complete is to write bounds checking code so that the arrow keys do not move the 4×4 window outside of the 49 possible TLC positions (for the 10×10 grid). The problem is that I did not write the TLC-control variable code (arrow keys) in a way that will make bounds checking easy. I think that part of the code will need to be rewritten to be not only more efficient but also allow for easy expansion later to a larger window size and larger overall map.
With just a few changes, the overall map is now 100×100 and the viewing area size (window) is 20×20 tiles, where each square tile is 16 pixels wide:
This blog post is written to demonstrate the connection between an idea – a large, predefined map area being displayed within a smaller window – and the mathematical and computational thinking behind it.
The Ontario Mathematics Curriculum (Grades 1-8) defines 7 mathematical processes:
- Problem solving
- Reasoning and proving
- Reflecting
- Selecting tools and computational strategies
- Connecting
- Representing
- Communicating
As I so often observe with students who are working on their Scratch projects, all seven processes are activated during work in project-based, design-thinking based coding-based projects. In my mapping project, without question, each of these processes was engaged at various times during work on the project.
This curriculum also divides mathematical concepts and skills into 5 strands:
- Number sense and numeration
- Measurement
- Geometry and spatial sense
- Patterning and algebra
- Data management and probability
In my mapping project, I needed an understanding of and the ability to apply concepts & skills in three key strands: number sense and numeration, geometry and spatial sense, & patterning and algebra. I needed to figure out (and then write the code) how to determine the correct 2D pattern of 4×4 tiles to display from the 1D linear array of values, the correct placement of the 4×4 grid on the screen in response to the arrow-key input, and the proper overlay of the 4×4 grid onto the Cartesian coordinate system the defines the stage in Scratch.
Stay tuned for a later update about the bounds checking code as well as details of the collaborative inquiry with the teacher and his grade 5 students.

Please Leave a Reply